Resources are created by copying existing ones, to ensure all the necessary roles and skills carry over.
Sections in this article:
Sending the welcome email (individual users)
Sending the welcome email (multiple users)
Duplicating a resource’s properties
Duplicating properties to multiple resources
Overview
Any user who needs to access the system requires a resource. New resources can be created by users with the required permissions (administrators or managers) from the Administrator > Web administrator > Logins or Manager > Rolodex tables > Resources pages.
Creating resources
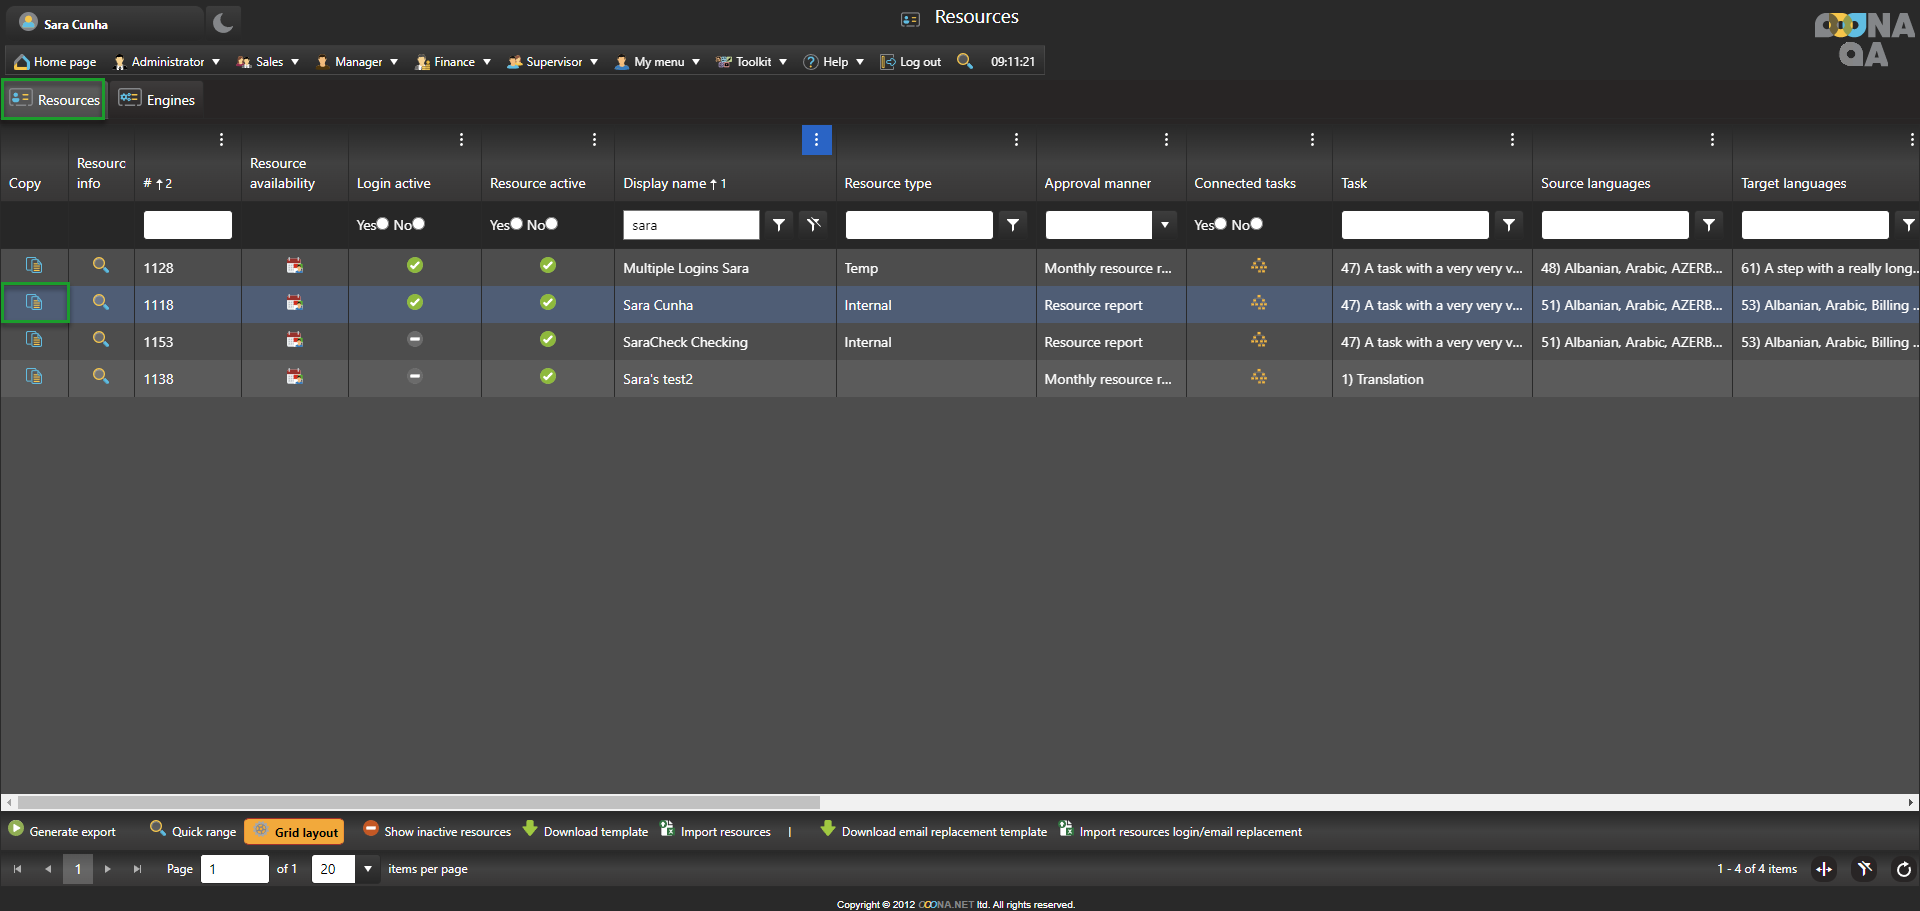
To create a new resource from Administrator > Web administrator > Logins or Manager > Rolodex tables > Resources, the user needs to copy from a resource who already has the roles and properties the new resource should have. For example, to create a project manager, copy from a resource that is already a project manager.
After clicking the “Copy” icon, the required option, “Create a new user with the same properties as an existing user” (1), will be selected by default. The following fields are mandatory:
1. First name - Combined with the last name, will be the name the resource will have in the system
2. Last name - Combined with the first name, will be the name the resource will have in the system
3. Login name - The name that the resource will use to log into the system
4. Email - The email address in which the user will receive the credentials and link to the system
5. Send password link by email - if on, after creating the resource, an email will be automatically sent out. If off, this can be done later.
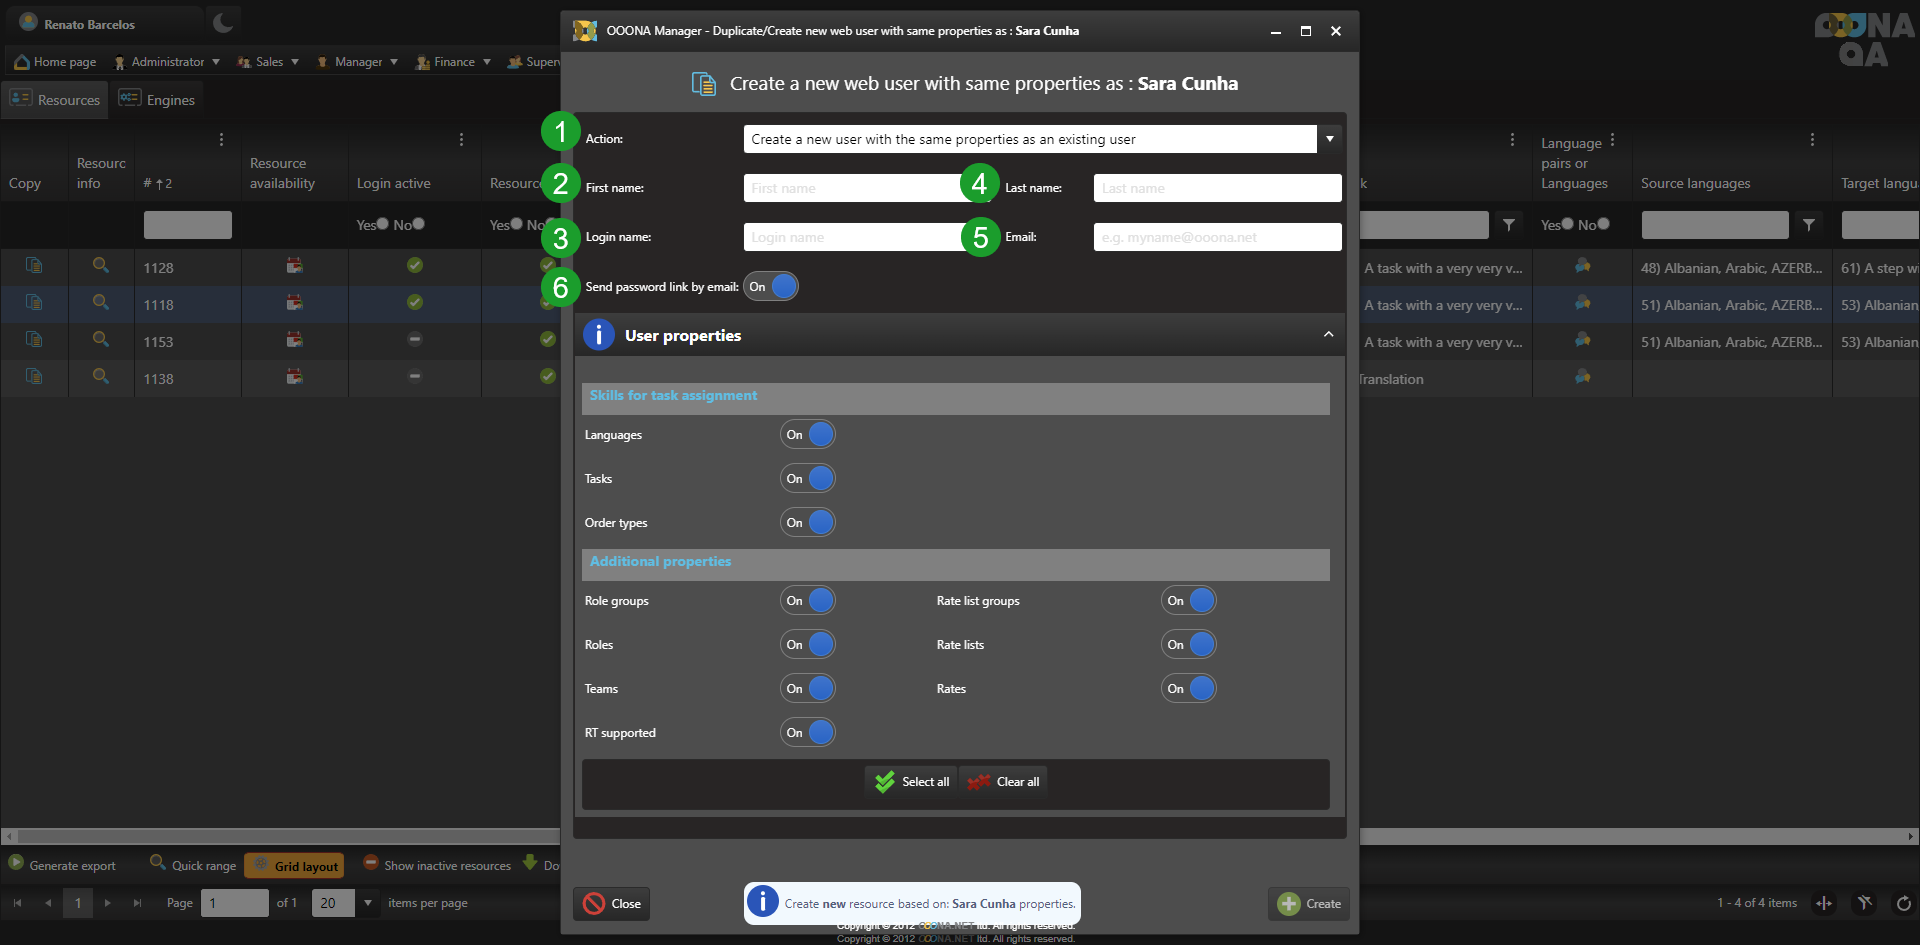
After filling out the mandatory fields, it’s possible to select which properties should be copied to the new resource:
7-9. The source/target languages, tasks and order types of the original resource. Please refer to our Management help files for more details.
10. Role groups - the role groups the original resource is linked to. Resources should always be part of a numbered role group.
11. Roles - roles the original resource is directly linked to (roles that are not part the role groups they’re already linked to).
12. Teams - the teams the original resource is part of.
13. RT supported - If the resource can be assigned to Realtime orders (Realtime module only).
14. Rate list groups - groups the original resource is linked to.
15. Rate lists - lists the original resource is linked to.
16. Rates - rates the original resource is linked to.
If a property is deselected, it will be created empty.
Once the selection is finished, click “Create” (17).
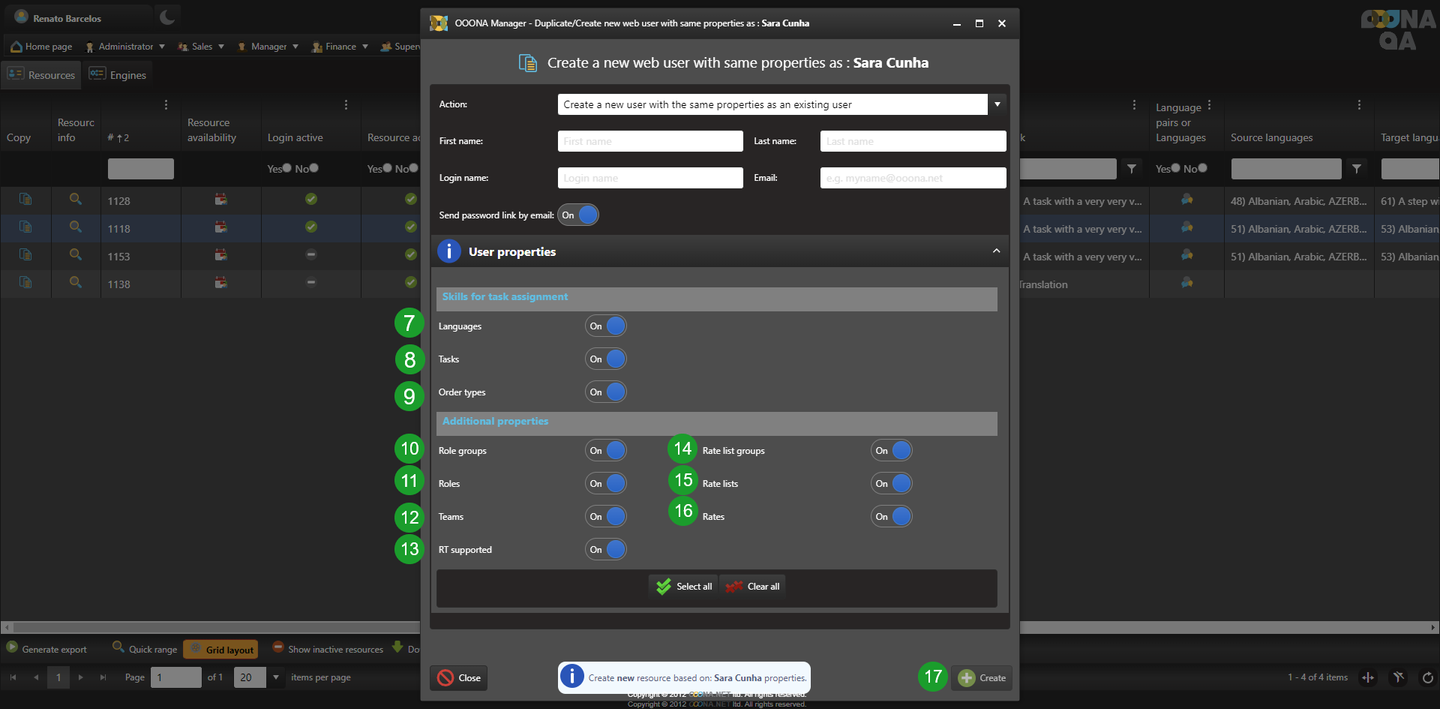
If some of the above properties are not selected, please make sure to set up the resource’s skills and the key information related to the new resource, otherwise the resource will not be available for assignment or not be connected to the required rates.
![]() Quick tip: When needing to create multiple resources at once, it’s recommended to set up one resource with all the required languages, tasks and role groups, and then create the necessary resources by copying from this one.
Quick tip: When needing to create multiple resources at once, it’s recommended to set up one resource with all the required languages, tasks and role groups, and then create the necessary resources by copying from this one.
Also note that, if the email entered is already being used in Toolkit, the “Create” button will be disabled and the following warning message will be displayed: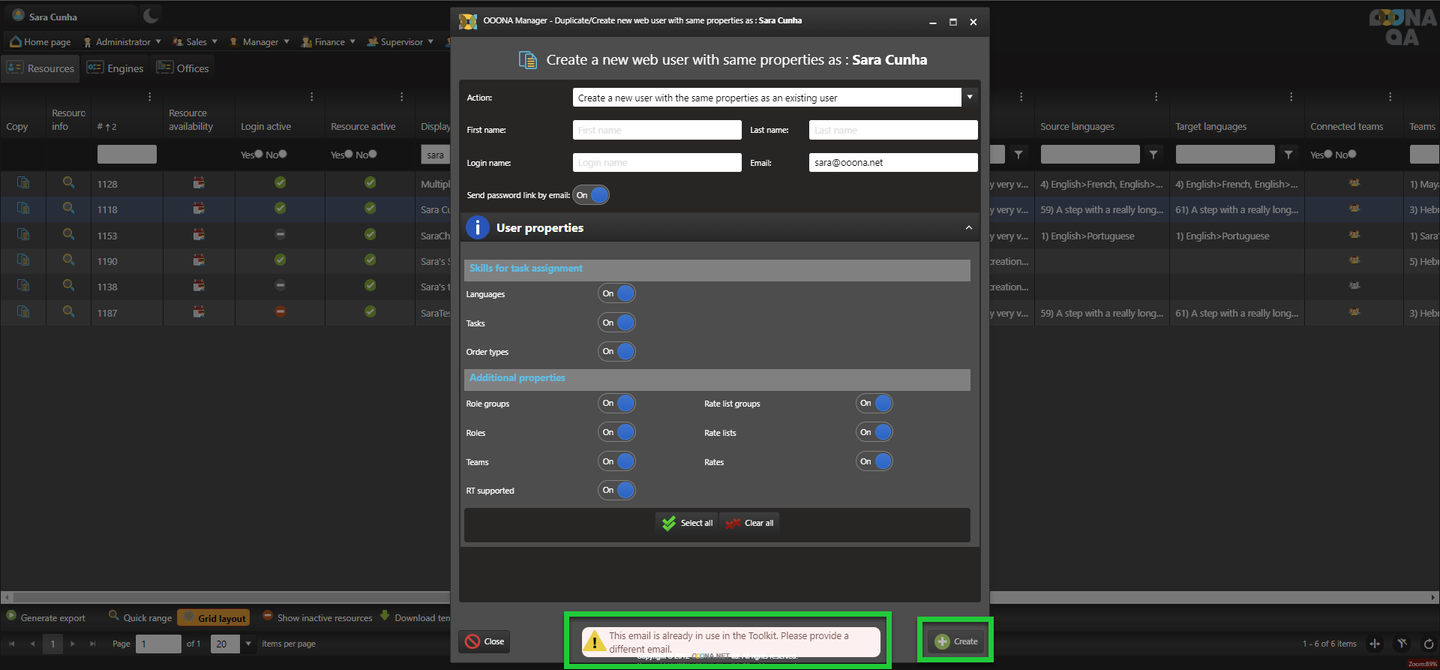
Sending the welcome email (individual users)
If the welcome email wasn’t sent during the resource creation process, it can be sent at any moment from Administrator > Web administrator > Logins or Manager > Rolodex tables > Resources using the “Email login info” column (1).
From the popup, two different emails can be sent: Password recovery email (2), for users needing to recover their password, or the Welcome email (3), which contains the required information to log in to the system for the first time (link to the system, login name, as well as a link to set the password for the first time). 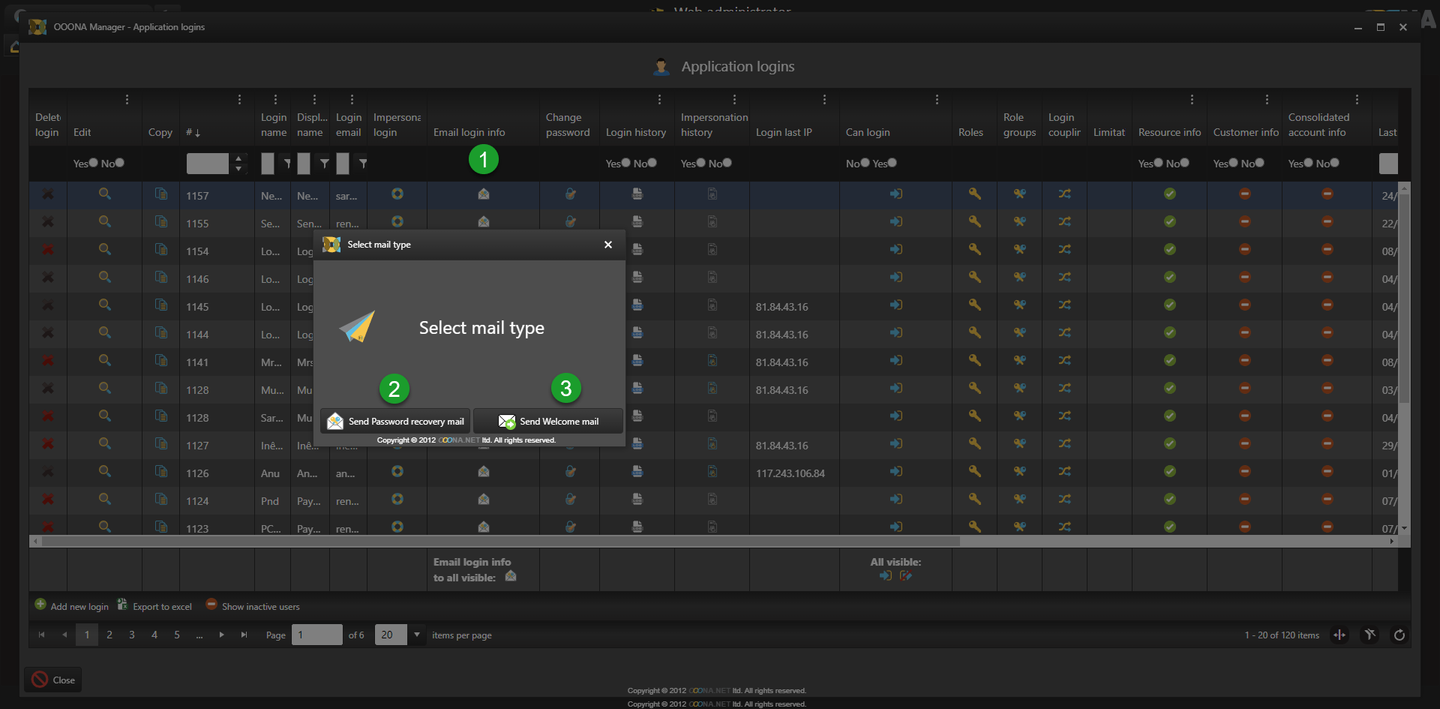
Sending the welcome email (multiple users)
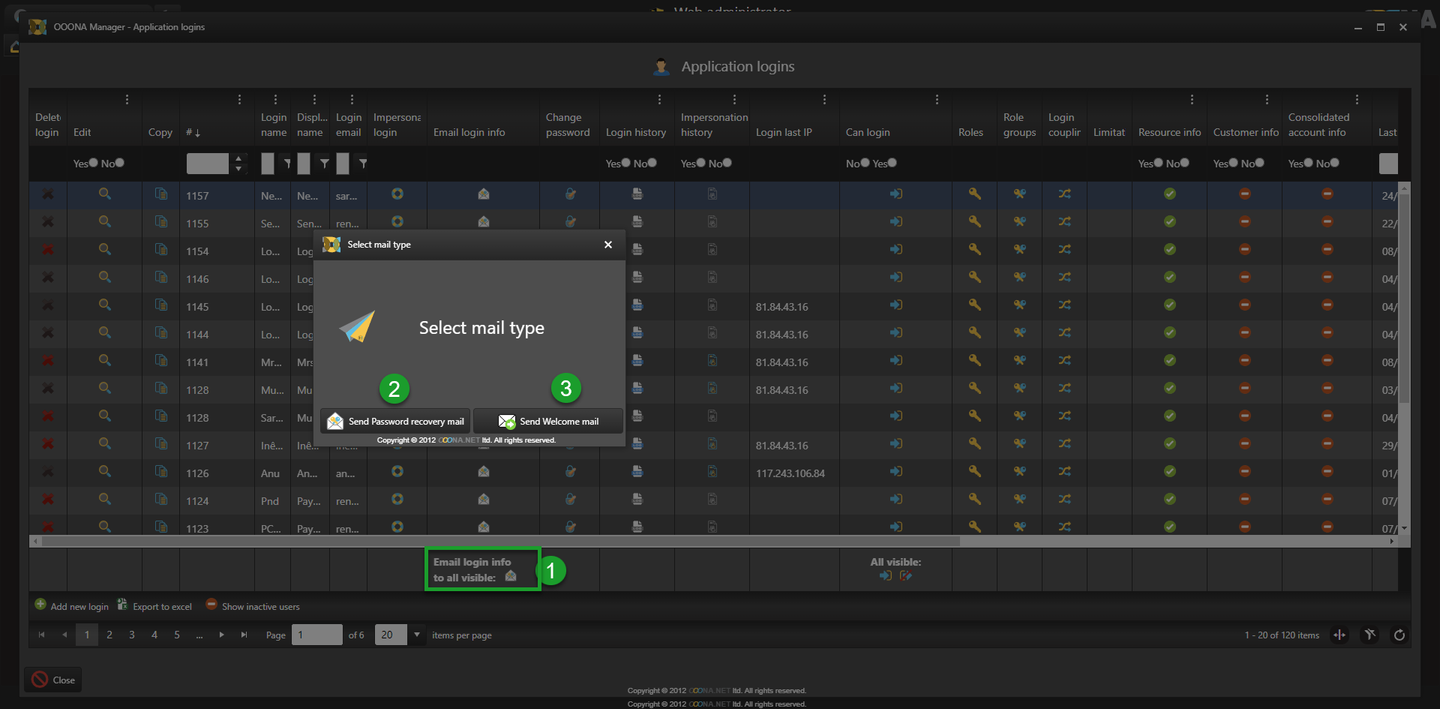
If the welcome email wasn’t sent during the resource creation process, it can be sent at any moment from the Logins page (Administrator > Web administrator > Logins) from the “Email login info to all visible:” button (1).
From the popup, two different emails can be sent: the Password recovery email (2), for users needing to recover their password, or the Welcome email (3), which contains the required information to log in to the system for the first time (link to the system, login name, as well as a link to set the password for the first time).
After selecting the email type, all resources visible on screen will receive it.
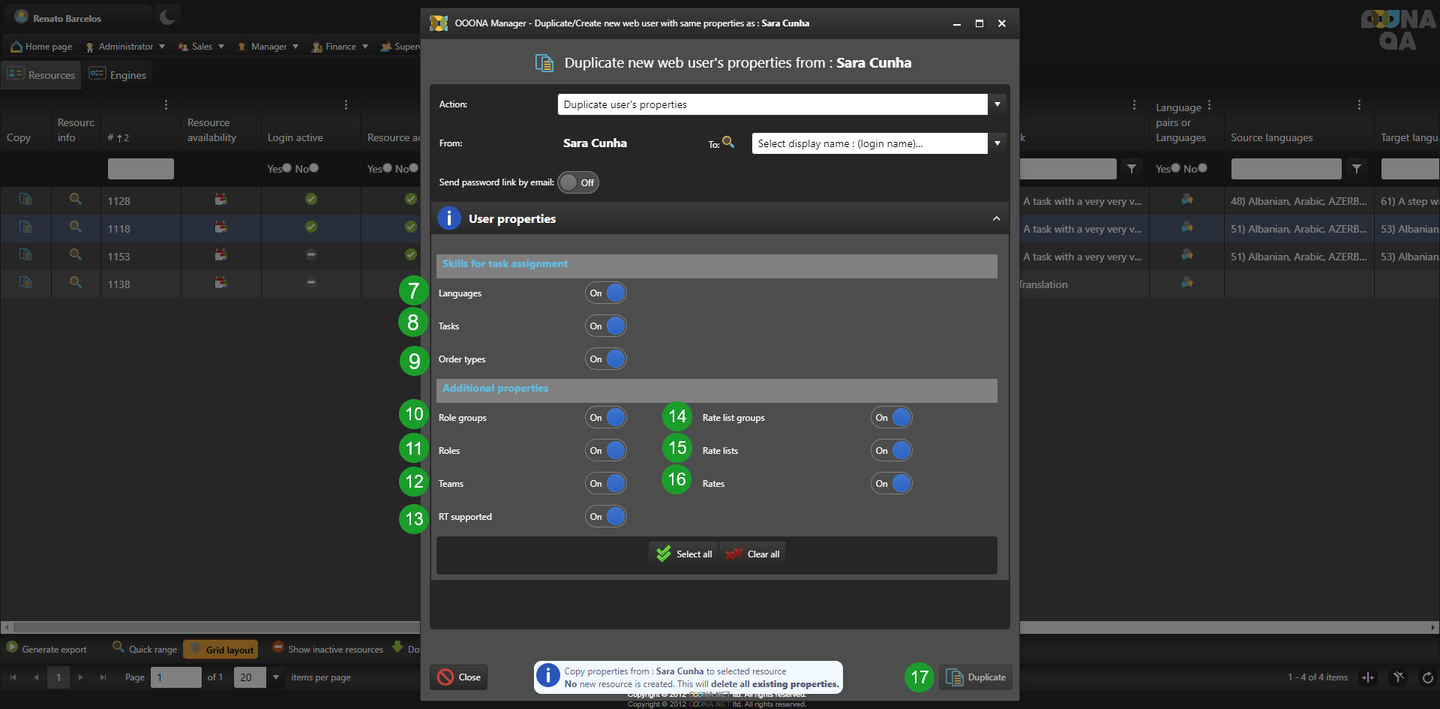
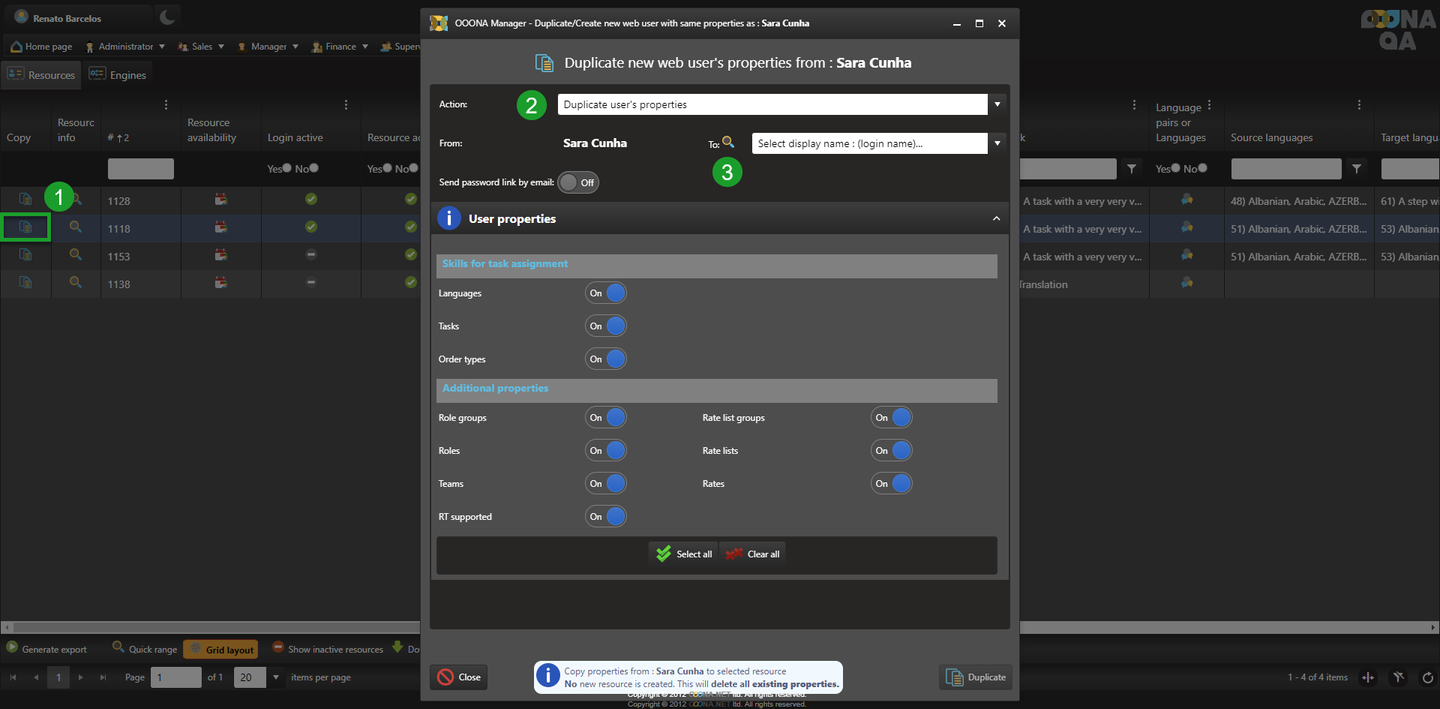
Duplicating a resource’s properties
If a resource needs to be changed to match an existing one, the target resource’s properties can be copied over.
To duplicate a resource's properties, go to Administrator > Web administrator > Logins or Manager > Rolodex tables > Resources and follow these steps:
-
Click on “Copy” icon next to the resource they want to duplicate from.
-
In the dropdown menu select “Duplicate user’s properties”.
-
In the “To” field, select the resource the properties should be copied to.
-
Once the required user properties have been selected, click on “Duplicate” to finish the process.
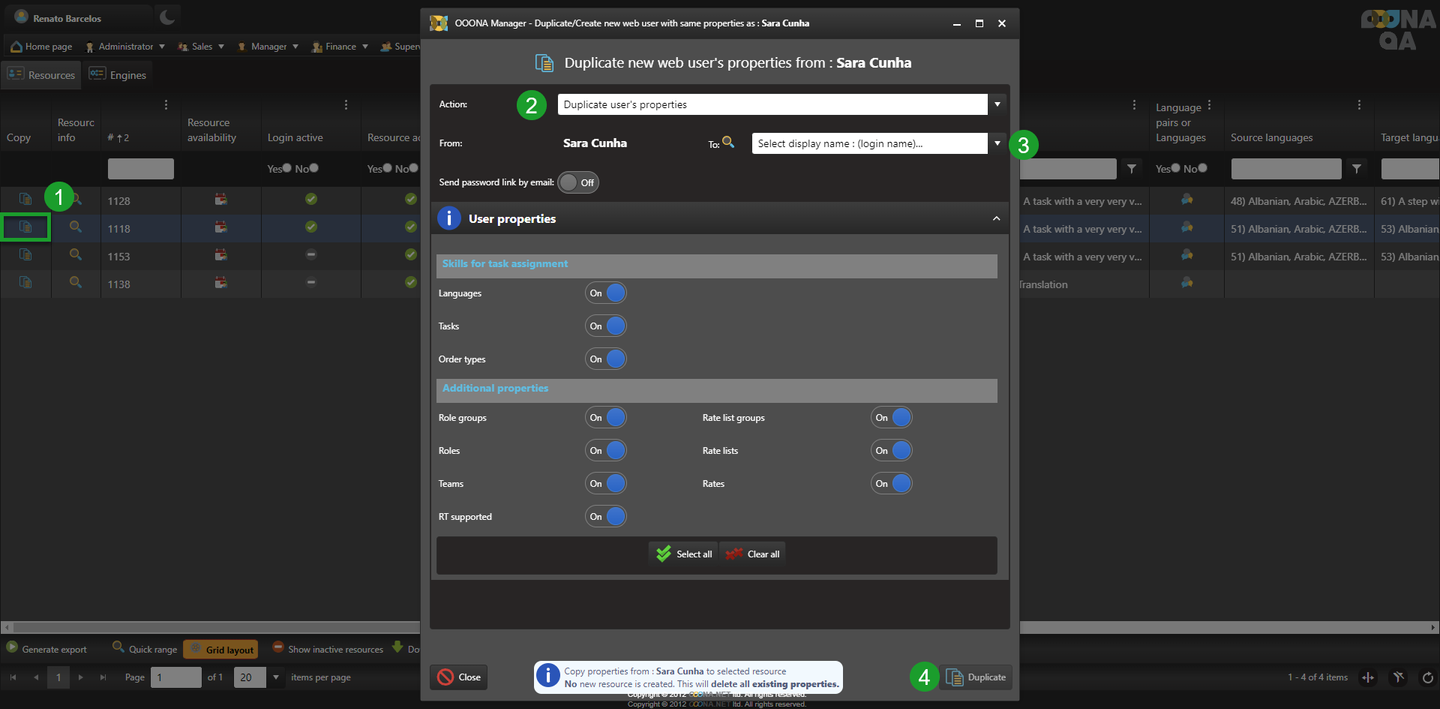
This process will overwrite the target’s properties.
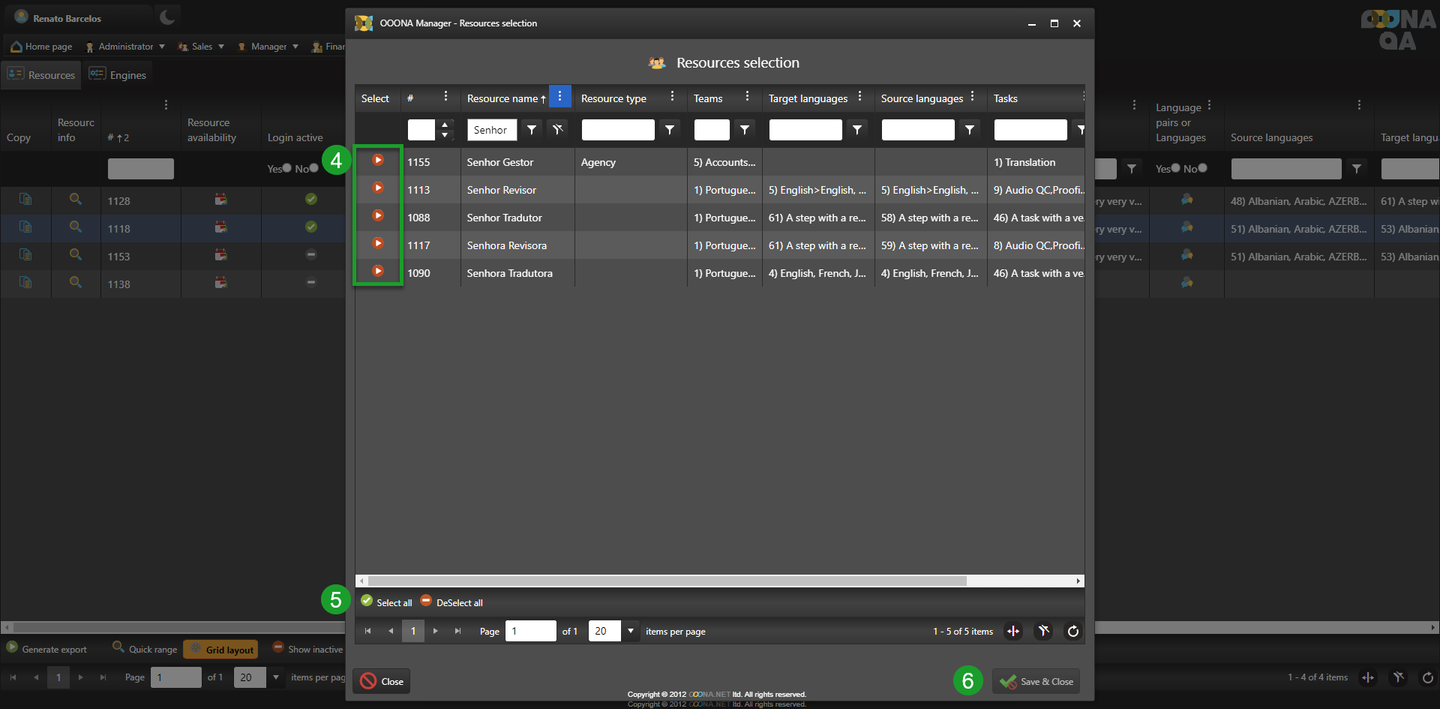
Duplicating properties to multiple resources
Properties can be duplicated to multiple resources at the same time.
If the properties need to be copied over to multiple resources, it can be done following these steps:
1. Click on “Copy” icon next to the resource they want to duplicate from.
2. In the dropdown menu select “Duplicate user’s properties”.
3. Click on the magnifying glass next to the “To” field.
4. Within the popup, select the resources that should inherit the original resource’s properties.
5. Alternatively, use “Select all” to select all currently visible resources.
6. Click on “Save & Close” to return to the previous page.
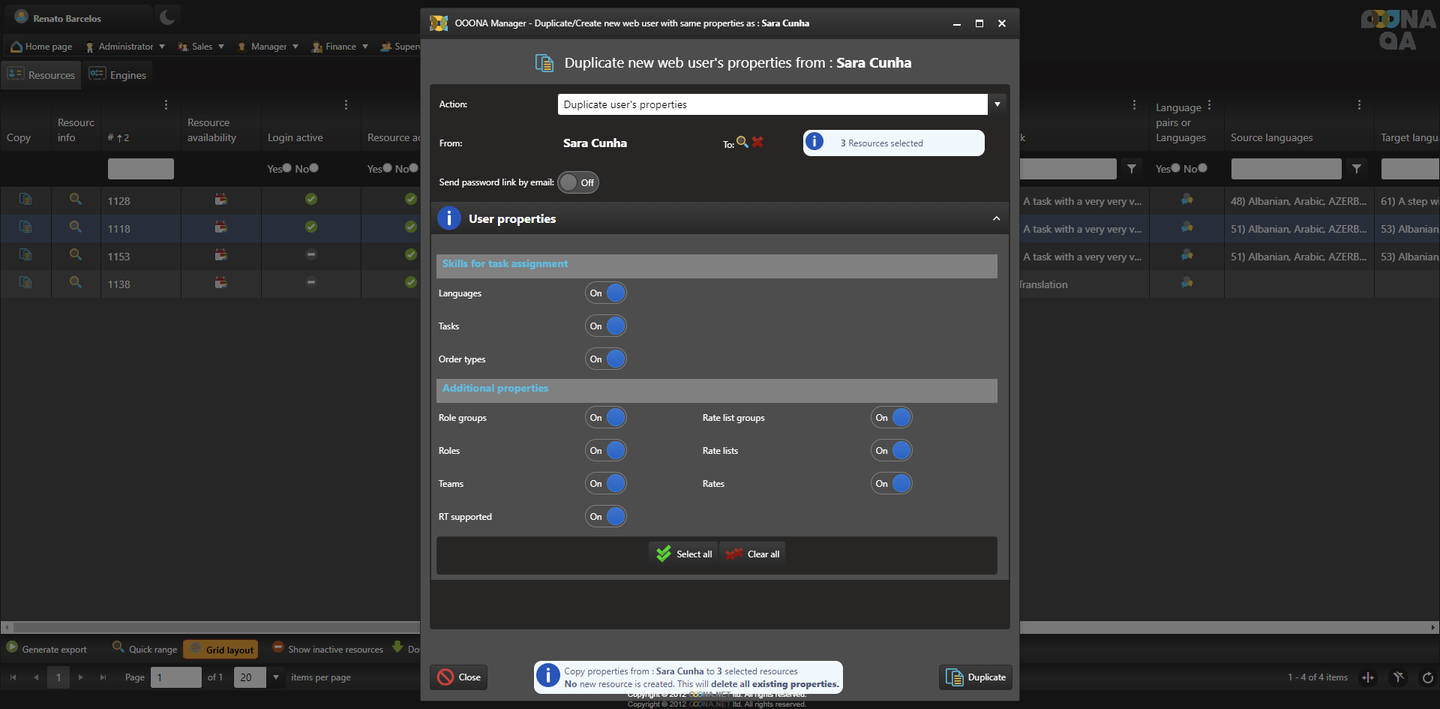
7-9. The source/target languages, tasks and order types of the original resource. Please refer to our Management help files for more details.
10. Role groups - the role groups the original resource is linked to. Resources should always be part of a numbered role group.
11. Roles - roles the original resource is directly linked to (roles that are not part the role groups they’re already linked to).
12. Teams - the teams the original resource is part of.
13. RT supported - If the resource can be assigned to Realtime orders (Realtime module only).
14. Rate list groups - groups the original resource is linked to.
15. Rate lists - lists the original resource is linked to.
16. Rates - rates the original resource is linked to.
Once the selection is done, click on “Duplicate” (17) to finish the process.
This process will overwrite the targets' properties.