Sections in this article:
- Overview
- Order creation via the generic excel template
- Order creation via a custom excel template
- Importing a custom excel into the system
Overview
Orders can be created in bulk by importing a pre-formatted Excel sheet. You can either use the system’s generic Excel template or configure a custom Excel template.
The generic template works out-of-the-box for all users.
A custom template requires configuration at the customer level or system level, depending on your needs.
Order creation via the generic excel template
Orders can be created by import from a template Excel sheet.
From: Sales dashboard > Bulk actions > Order > Import > From Excel
Start by downloading the Excel sheet template:
Fill in all necessary cells in the template Excel sheet. Each order is to be filled in, in a separate line.
Same as when creating orders with “Add new order”, some fields are mandatory.
Note: all fields in the Excel sheet must be filled in with cell type "Text" (fig 1)
To import the orders:
-
Click the upload excel button
-
If you’re trying to import a custom excel (as explained here Order import from excel | Order creation via a custom excel template ) select the customer and the relevant Import configuration. The Language format, Product separator and Language separator will be auto-populated automatically according to the configuration you selected, and you can also change them manually here if relevant to the excel you’re uploading.
If you’re uploading a system default, keep the system default selected in “Import configuration. -
Upload the Excel sheet.

4. After uploading the Excel sheet, the import lines will be displayed.
5. If all fields are correctly entered, the Validation information icon will be green.
6. When mandatory fields are missing or if any field is invalid, the order cannot be imported.
The “Validation information” icon will be orange and when hovering over it, the invalid or missing fields will be listed. The missing data field will also be marked in red.
7. To update missing data in the import lines you can either click on an individual line and edit or click the “Open update” button to open the “update import field” popup, where you can update multiple fields and lines in one go.
For example, in the below picture all lines will be updated with Duration “45:00” and Customer “Nadav Productions”
You can apply the changes to either all rows or all rows on screen.
Importing a new series: If a new series was entered into the Excel sheet, it will be indicated as an invalid value. Add the new series directly from the import page by clicking the “Add series” button (fig 1-2).
After adding the series, it will no longer be indicated as invalid
After fixing all invalid fields, each line can be imported into an order by clicking “Create order” (1).
All valid lines can be imported into orders by clicking “Import all valid orders” (2).
Note: we recommend to first create one order from the individual “Create order” button (1), and only after making sure the order was created correctly (template, price, and info), importing all remaining orders by clicking “Import all valid orders” (fig 2).
After clicking “Import all valid orders”, click “Apply to all same orders” to create orders from all valid import lines.
After clicking “Apply to all same orders”, the product selection page will launch.
Click “Save and Close” to continue.
To create orders using only some of the products in the workflow template (product selection), click the green arrow button of the required product to disable the product. The disabled product will not be added to the order.
Finally, follow the pricing validation instructions mentioned above.
After clicking “Apply pricing” all import lines are created into orders, click “Close” to go back to the orders page.
The range in the Orders page will be auto-populated to include only the newly created orders which will be displayed on the screen. Click “Clear range” to revert to the full order view.
Order creation via a custom excel template
Configuring the custom excel in the system
To use a custom Excel file, you must first configure the import settings so the system knows how to read your file.
You can access the import configuration from the customer information popup by selecting Import Configuration.
First, choose between a customer-level configuration or a system-level configuration, then click “Add New Import Configuration” for the type you want to add.
A customer-level configuration will be available only when importing Excel files for this specific customer, while a system-level configuration will be available for all customers.
Once inside the configuration popup, select the import type “Order Import” and fill in the fields according to the following instructions:
-
Description – A short description used to identify this specific configuration.
-
Sheet Index – Specifies which sheet in the Excel file the system should read data from. If your Excel file has only one sheet, enter 1 in this field
-
Start at Row – Indicates the row from which the system should begin reading data. For example, if your Excel file starts at row 3, enter 3 in this field.
-
Language Format – The Language format field is unique: the system can interpret both the language and the product type from it. (This setup is uncommon and may not apply to your case.)
If you intend to populate the Language field with only the languages of the order (Example: Russian, English, French), select Language Separator Only.
If you intend to include both the product and the language in the same field, choose one of the following based on your Excel format:
Product Separator and Language Separator (Example: Timing-English,VO-Russian)
or Language Separator and Product Separator (Example: English-Timing,Russian-VO). -
Language Separator – Enter the character used in your Excel file to separate languages in the Language field.
-
Product Separator – Enter the character used in your Excel file to separate products in the Language field.

The figure below shows an example of an Excel file to which the above settings would be applied:
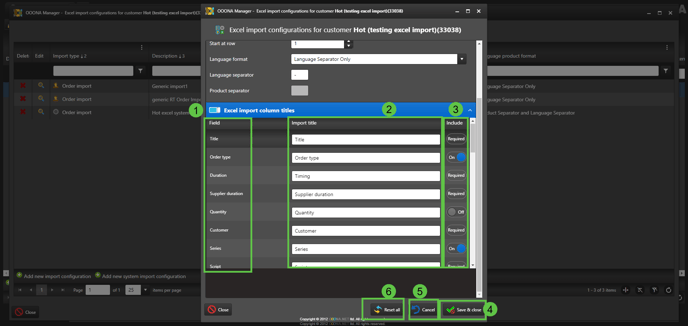
Once configured, proceed to the “Excel Import Column Titles” section of the popup. Here, you'll need to set aliases for the system columns heads based on how they are named in your Excel file.
This allows the system to correctly interpret each column by mapping it to the corresponding system field. Follow these instructions to populate the fields:
- Field – This is the default name of the corresponding field in the system.
- Import Title – Enter the name of the column as it appears in your Excel file.
For example, if the Title field in your Excel is also named "Title," simply leave "Title" in the Import Title field. If the Duration field in your Excel is named "Timing," enter "Timing" instead. - Include – This is a switch that lets you tell the system whether to read data from a specific column.
For example, if your Excel file doesn’t contain any information for Quantity, you can switch Include to OFF, and the system will skip that column during import.
Note: Some fields, such as Title, are required to open an order and cannot be set to OFF. - Once all field aliases are set, click Save and Close.
- Click Cancel to undo the last edit and return to the last saved version of the configuration.
- Click Reset All to restore all fields to their default system state.

Importing a custom excel into the system
Once all configurations are complete, follow these steps to import the custom Excel file:
- From: Sales dashboard > Bulk actions > Order > Import > From Excel
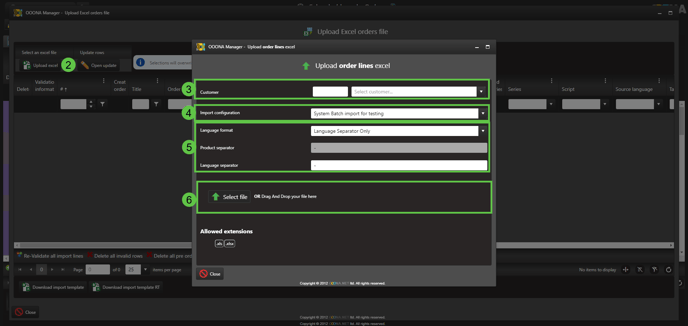
- Click "Upload Excel."
- If you’re importing a customer-specific Excel, select the customer from the Customer dropdown and choose the linked configuration from the Import Configuration dropdown below.
- If you’re importing a system-level configuration, select the required system Import Configuration without selecting a customer.
- The Language Format, Product Format, and Language Separator will be auto-populated based on your settings, so there’s no need to modify them here.
- Upload the Excel file in the box below.
Once the Excel file is uploaded and the imported lines are displayed, you can proceed with the usual order creation process, as outlined at the beginning of this manual.

Note - if your importing a new product of language that are unfamiliar to the system you’ll need to map them first.
To do so, click the content of the language of the product to open the mapping popup, there simply map the correct language of product:


