Sections in this article:
Welcome page message
Welcome page messages are messages displayed on the home page of OOONA.
When you log into your system, this is how the Welcome page message is shown.
From: Manager > Messages > Welcome page message
-
Click “Add new message” (fig 1)
-
Select who the message will be displayed to: Resource types / Consolidated accounts or Customers that have a customer portal to the system, from the “Targeted at” list (fig 2)
-
Type your message in the Message box (fig 3)
-
Click “Save” (fig 4)
When not using Resource types - you must select “All” in the “Targeted at” list (fig 3) - this will make the message visible to all Resources / Consolidated accounts and Customers that have a customer portal to the system.
For more information, see Resource Types.
When adding multiple Welcome page messages only the most recent message will be displayed.
Only managers can create messages.
Editing an existing Welcome page message
From: Manager > Messages > Welcome page message
-
Click the “Edit” icon (fig 1)
-
Make the required changes (fig 2)
-
Click “Save”
Messages are automatically set to Active when created.
To deactivate a message, click on the “Active” icon in the message list
To activate a message, click on the “Inactive” icon in the message list
From: Manager > Messages > Welcome page message
-
Click on the red X of the required message to be deleted (fig 1)
-
Click “yes” in the message that appears (fig 2)
“What’s new” message
What’s new messages are one-time popup messages that are displayed on login.
They are kept for reference and can be later be viewed again on demand.
This is what a "What's new" message will look like when you log into your system.
What’s new messages will be displayed to targeted resource types / Consolidated accounts or Customers that have a customer portal to the system. See Resource Types
Adding a What’s new message
From: Manager > Messages > What’s new message
-
Click “Add new message” (fig 1)
-
Select who the message will be displayed to: Resource types / Consolidated accounts or Customers that have a customer portal to the system, from the “Targeted at” list (fig 2)
If you’re not using Resource type, select “All” as your target audience
3. Type your message in the Message box (fig 3)
4. Click “Save” (fig 4)
When not using Resource types - you must select “All” in the “Targeted at” list (fig 3) - this will make the message visible to all Resources / Consolidated accounts and Customers that have a customer portal to the system.
From: Manager > Messages > What’s new message
-
Click the Pencil icon (fig 1)
-
Make the required changes (fig 2)
-
Click “Save”
Messages are automatically set to Active when created.
From: Manager > Messages > What’s new message
To Deactivate a message:
-
Click the Pencil icon (fig 1)
-
Uncheck the “Active” checkbox (fig 2)
-
Click “Save”
To Activate a message:
-
Click the Pencil icon (fig 1)
-
Check the “Active” checkbox (fig 2)
-
Click “Save”
From: Manager > Messages > What’s new message
-
Click on the red X of the required message to be deleted (fig 1)
-
Click “yes” in the message that appears (fig 2)
Megaphone messages
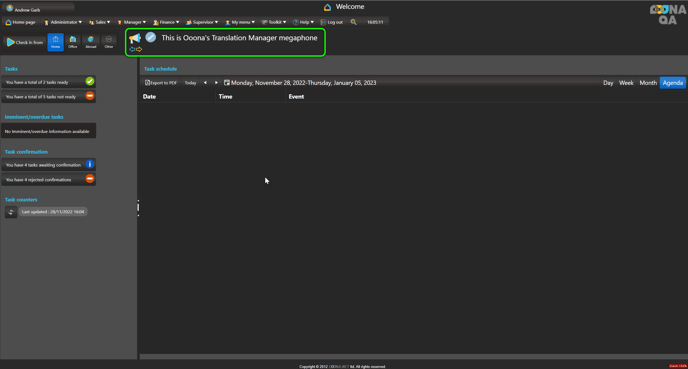
Megaphone messages (fig 1) are messages displayed at all times on the home page of OOONA.
This is what a megaphone message looks like in the home page.

Adding a Megaphone message
From: Manager > Messages > Welcome page megaphone
-
Click “Add new message” (fig 1)
-
The first row of messages becomes editable:
-
Select who the message will be displayed to: Resources / Consolidated accounts or Customers that have a customer portal to the system, from the “Targeted at” list (fig 2)
-
Type in the required message (fig 3)
-
Select an Image from the image list (fig 4)
-
-
Click on the green V to save (fig 5)
When not using Resource types - you must select “All” in the “Targeted at” list (fig 3). This will make the message visible to all Resources / Consolidated accounts and Customers that have a customer portal to the system.
Only managers can create messages.
Displaying multiple Megaphone messages
By setting multiple Megaphone messages to “Active”, the system will display them one after the other in sequence.
The user can manually scroll between the messages using the navigation arrows beneath the Megaphone
From: Manager > Messages > Welcome page megaphone
-
Click the Pencil icon (fig 1)
-
Make the required changes (fig 2)
-
Click “Save” (fig 3)
Messages are automatically set to Active when created.
From: Manager > Messages > Welcome page megaphone
To Deactivate a message click on the “Active” icon in the relevant row (fig 1)
To Activate a message click on the “Inactive” icon in the relevant row (fig 2)
From: Manager > Messages > Welcome page megaphone
-
Click on the red X of the required message to be deleted (fig 1)
-
Click “yes” in the message that appears (fig 2)


